Throughout this course, we also want you to focus on your code quality in addition to the functionality of your code. For the complete list of code quality items we’ll look at throughout the quarter, please consult the code quality document. If we see code quality issues during code reviews, we will ask your group to resubmit the project with those issues fixed.
We will take off points if your code has memory leaks, so be sure to check for them before you submit your code!
There are a lot of subtasks for this project but only because we’ve decided to break things down into very small pieces. The project is actually much less coding than previous projects!
forces.h
For last week’s space invaders demo, you might’ve noticed that with how destructive collisions
were set up, we had to manually recount the number of invaders left every tick. Wouldn’t
it have been nicer if we kept track of the number of invaders in state_t, and we
decremented it every time a destructive collision occurred?
We’ve added collision_handler_t and create_collision abstractions this week which would solve that problem.
collision_handler_t describes the format of a generic collision handler that takes two bodies,
the axis of collision (more on that later!), an optional auxiliary info variable, and a force constant.
aux is given to provide any useful information to the collision handler. If we were to
remake our space invaders demo from last week, for example, aux could be the state_t of the game
that contains the number of remaining invaders.
create_collision is how you register the custom collision handler. It acts very similar
to the create_x force functions and uses scene_add_force_creator internally to
register a collision force creator along with the collision handler that you pass in.
It checks if a collision has occurred between the two bodies, and only then
will it call the collision_handler_t that you passed in.
Game
This week, you will be adding the ability to attach bodies to assets so that images can be rendered on top of bodies. After implementing the library, you will fill in parts of the game to implement a basic version of Frogger:
Small Asset Engine Changes
We’ve decided to modify asset.c this week. Last week for the meme generator, we had to manage a list of assets
in the state. It’s reasonable to assume that each demo from here on out will
maintain a list of assets, so we’ve decided to follow a similar design pattern
to what we did in asset_cache: store a global list of assets in asset.c.
If you click into asset.c, you’ll see that we’ve declared a static ASSET_LIST variable
at the top. We’ve modified asset_init to initialize ASSET_LIST if it hasn’t already
been initialized.
Since we’re using this list and no longer maintain our own, we no longer have to return asset_t’s
in our asset_make_x functions: we can just directly add them to our internal list!
As a result, the function signatures of asset_make_image and asset_make_text have
changed from asset_t * to void. You first task will be to update the code
to reflect this change.
Task 1.
Copy over your implementations of asset_make_image and asset_make_text from
last week to this week’s project, but instead of returning the assets, add them to ASSET_LIST.
Because of this change, we’ve also added and implemented two more functions for you:
asset_reset_asset_list and asset_get_asset_list. You’ll use these two functions
to interact with the asset list from the demo.
Attaching Bodies to Images
To render images over bodies, there are two design choices that we can make: attaching bodies to images,
or attaching images to bodies. In this implementation, we’ll go with the former. Among other things,
we’ll have to refactor less of our library, and we can preserve our pattern of storing assets in a list and rendering them in emscripten_main.
Asset Library Overview
We’ll begin by taking a look at asset.c and asset.h. In asset.c, we’ve provided
the new image_asset_t struct for you: the only thing we’ve added is a body field.
If you open up asset.h, you’ll notice that we’ve added a new function: asset_make_image_with_body.
It allows the user to initialize an image asset using the filepath and body.
Note that the function doesn’t need to take a
bounding box anymore, because the image will be rendered over the body, whose bounding box may
change after every tick.
Since we want the image to be rendered over its body, we’ll need a way of getting the bounding box that corresponds to the body. This leads us to our first task.
Getting the bounding box for a body
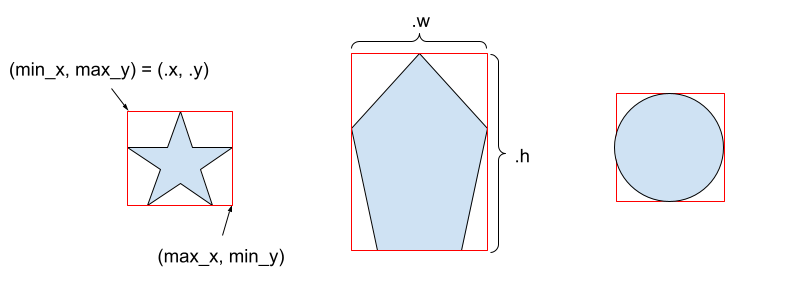
Getting the bounding box for a body will be relatively straightforward. We’ll want the bounding box to be the smallest box that can cover the body entirely.
Thus, we’ll iterate through all the points in the body, storing variables for the
top left and bottom right corners as vectors. Once we’ve iterated through all the points,
we’ll know that the smallest bounding box will have a top left corner at
(min_x, max_y) and bottom right corner of (max_x, min_y). Then, we can
use those points to calculate the fields of the SDL_Rect that we return. Remember that .x and
.y refer to the top left point, and .w and .h can be calculated from the difference
between the maximum and minimum x and y values.
If you are looking for a really small number to use, use -__DBL_MAX__ instead of __DBL_MIN__!
Since we are using SDL_Rect (and another reason that will become clear later), we should implement
the function to get a bounding box for a body in sdl_wrapper.c.
Task 2.
Then, create and implement a function to get a bounding box for a body in sdl_wrapper.c.
Make sure to define
the function header in sdl_wrapper.h!
For reference, our function signature for this function was: SDL_Rect sdl_get_body_bounding_box(body_t *body).
Modifying asset.c
Now we can modify asset.c to render images that contain bodies.
Now that our image assets can contain bodies, we’ll have to modify our asset_make_image
functions slightly. We’ll still keep the code that’s currently in the asset_make_image function but just
add a line setting the body field to NULL. In asset_make_image_with_body, we’ll set the body field appropriately
but pass in an arbitrary SDL_Rect to asset_init.
Task 3a.
First, copy and paste your last week’s implementation of asset_render to asset.c.
Then, implement and modify asset_make_image_with_body and asset_make_image, respectively.
Now that the user can initialize image assets with bodies, we’ll also have to change asset_render,
and more specifically, the case if the asset has type ASSET_IMAGE.
The fix will be small: if the asset’s body field is not NULL, we’ll set the bounding box
to the body’s bounding box (which we can get using the function we just wrote). Otherwise,
we’ll render the image asset like normal.
Task 3b.
Modify asset_render so that images with bodies use the body’s bounding box.
game.c
Now we can start putting everything together in game.c.
We’ve given you most of the starter code. While you look through it, take a
look at emscripten_main: it iterates through the body_assets list set by asset_get_asset_list()
and renders each asset. Your job is to add the image assets in emscripten_init.
We’ve defined the filepaths for you at the top of the
file. You’ll want to call the new asset_make_image_with_body function.
Task 4a.
Modify emscripten_init so that the frog and log bodies attach to their corresponding
image assets. Make sure to only replace the TODOs labeled with “TODO (task 4a)...”.
Once you’re done, run make game or make NO_ASAN=true game.
If you’ve followed everything so far, your images might look a little funky:
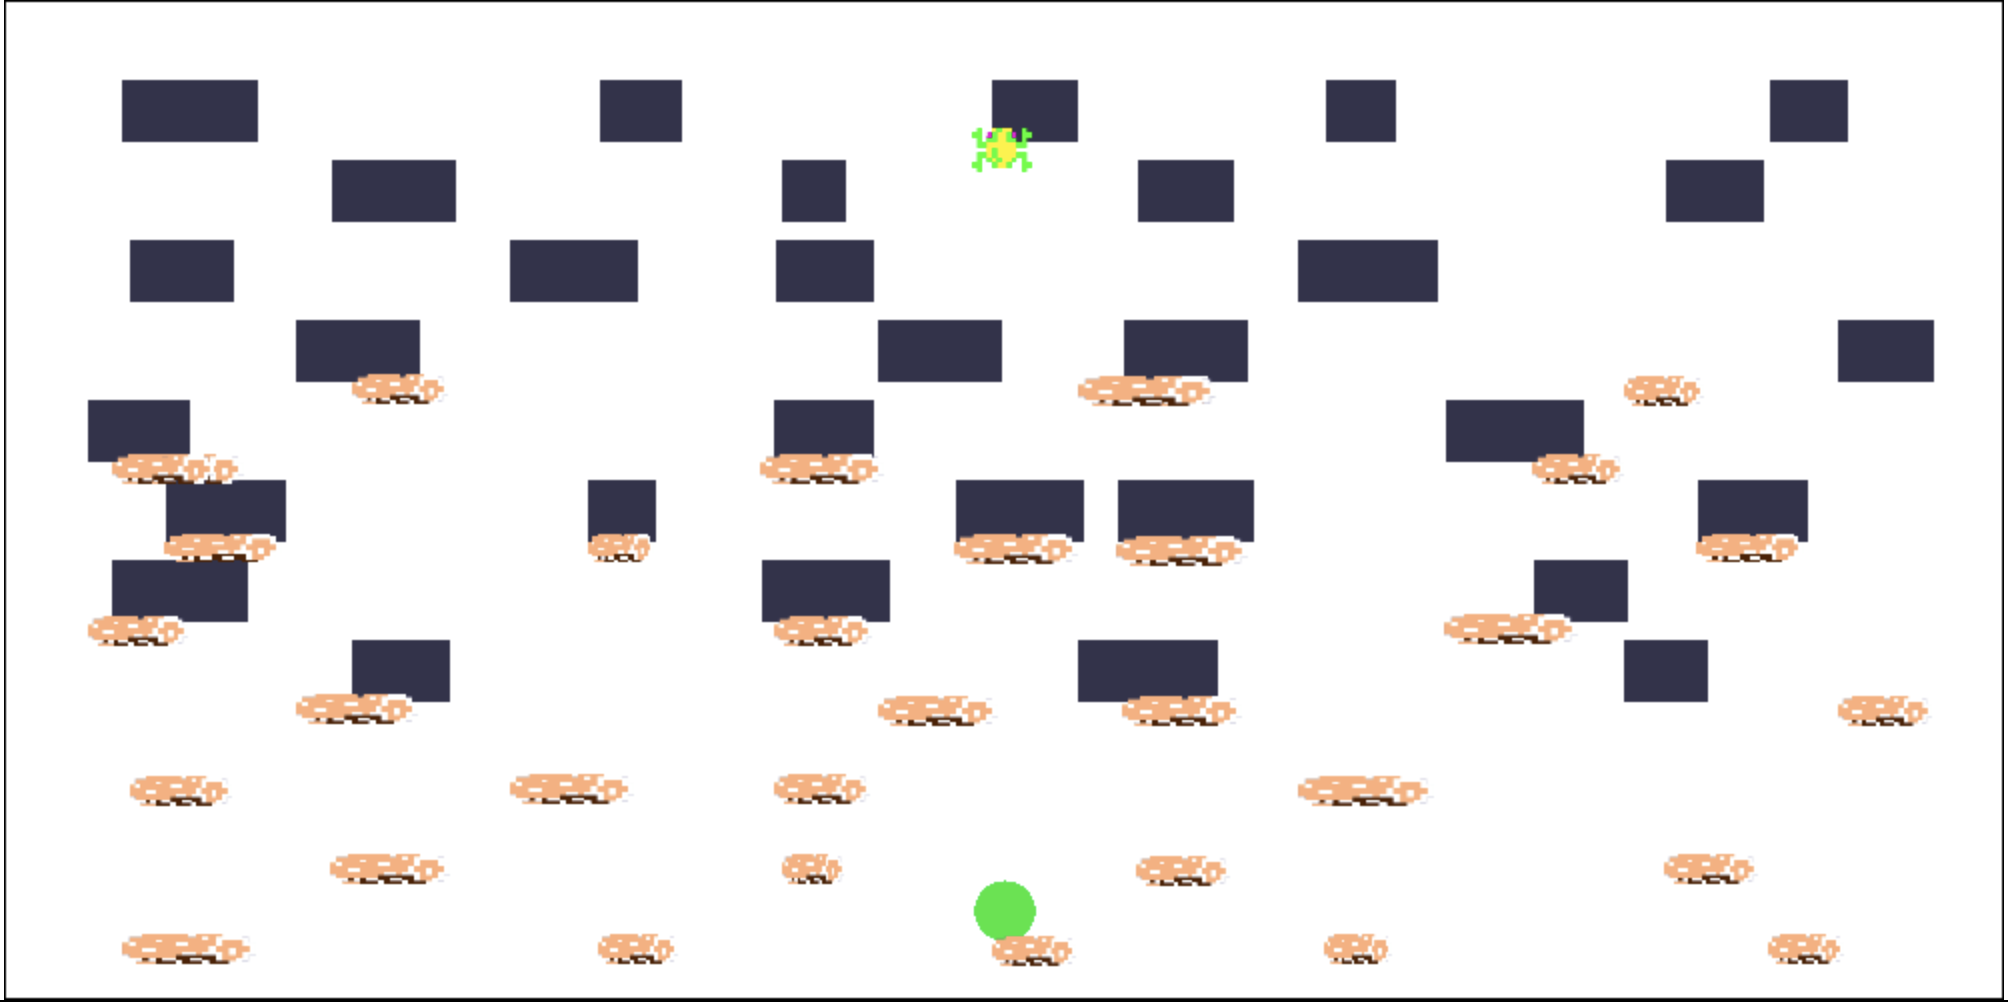
It seems like the images are flipped across the center of the window. When the frog body moves up, the corresponding image moves down.
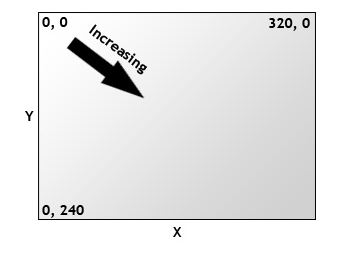
This is because of a small nuance in our function to get the bounding box for a body. In the SDL library, the y coordinates increase from top to bottom, not bottom to top. This explains why the images are “flipped” horizontally:
How should we fix this? Take a look at sdl_draw_body function in sdl_wrapper.c and
look at how bodies are rendered. As it iterates through all the points in the body,
it accounts for the different y axes by using get_window_position and get_window_center
to get the appropriate SDL coordinates. It then uses the new list of converted points to render
the body onto the screen correctly.
We’ll do the same thing in our function to get a body’s bounding box. Since we’ve defined it in
sdl_wrapper.c, we have access to the get_window_position and get_window_center functions.
Following sdl_draw_body as a guide, we’ll get the window center and use it to convert
the top left and bottom right variables to the appropriate SDL coords.
Once you do that, you may also have to fix how we calculate .h for the SDL_Rect that we return
since the top left corner now has a smaller SDL y coordinate than the bottom right corner. If
.h is negative, the image won’t appear.
Task 4b. Modify your function to get the bounding box of a body so that it converts each coordinate to an SDL coordinate.
Once you’re done, run make game or make NO_ASAN=true game.
If done correctly, the images should overlay the bodies like this:
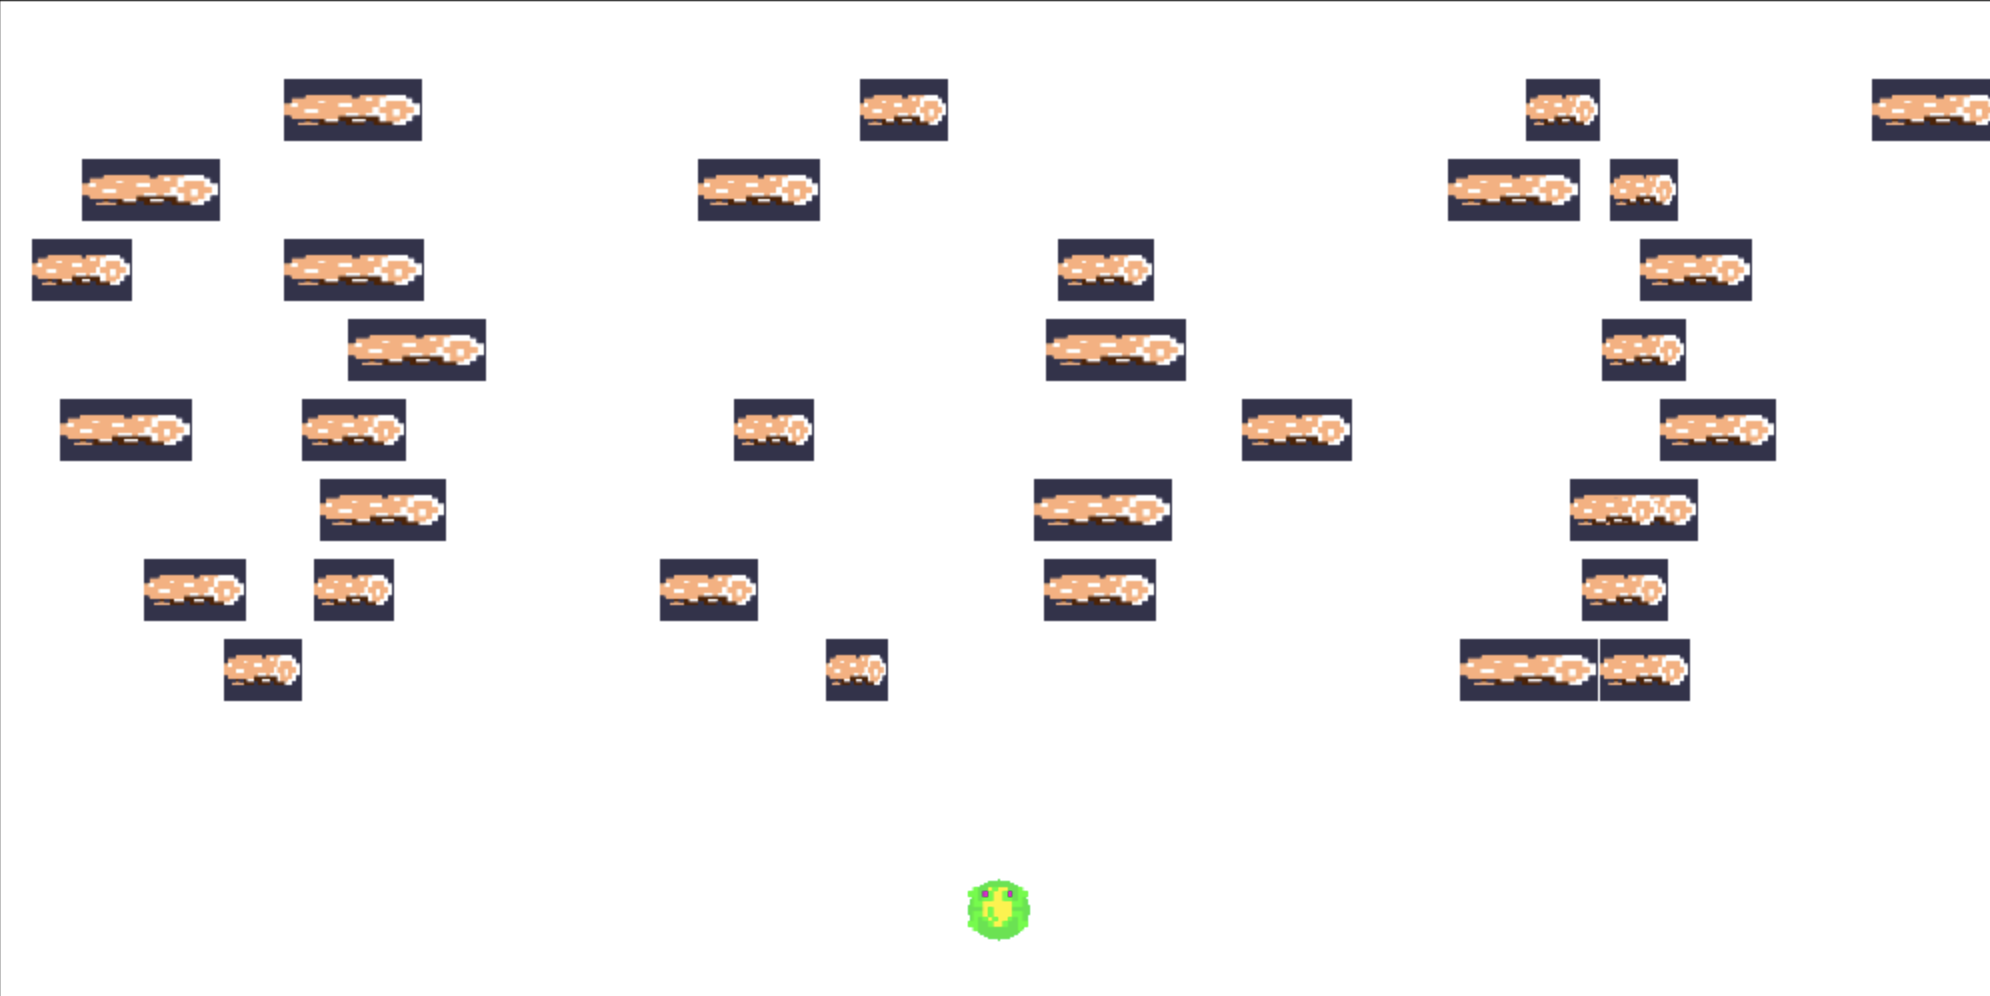
However, there’s one problem: the bodies can be seen behind the images. There are two fixes for this:
- We can render a background image. Since we are rendering all the images after we render the bodies, the bodies won’t be visible.
- We can delete
sdl_render_scene()fromemscripten_main, since every body in our scene has a corresponding image.
In emscripten_init, replace the “TODO: (4c)...” with code to render the background image
and add it to the state. Note that we shouldn’t be using asset_make_image_with_body since
there is no body attached to the background image.
Even though we have a background image now, we might as well delete sdl_render_scene from emscripten_main
since the bodies won’t be visible anyways.
Task 4c.
Modify emscripten_init so that the background image is initialized and emscripten_main
so that we no longer run sdl_render_scene.
Once you’re done, run make game or make NO_ASAN=true game.
Congrats! You’ve implemented a basic version of Frogger.
Removing bodies attached to assets
In this frogger game, we aren’t removing any bodies. However, if we had removed any bodies that were
attached to images (which you will most likely be doing for your game), this could lead to problems like memory out of bounds errors.
Why would this happen? The scene is currently responsible for calling force
creators, which may mark bodies as removed and then free them all
within scene_tick. If we then try to render all the image assets with bodies in the
next tick, we’d be accessing memory that has already been free’d.
We briefly discussed the structure of scene_tick in project03, but here it is
again for reference:
- Goes through all the force creators and applies them onto bodies, potentially marking some bodies for removal.
- Goes through all the bodies that are marked for removal, and removes any force creators that are supposed to act on them.
- Actually removes and frees the bodies that have been marked for removal.
Before step 3 occurs, we need to somehow go through all the image assets and remove any of the ones whose bodies are about to be removed.
Our proposed solution is the following: every time body_remove is run, body_remove
will pass in the body to asset_remove_body, whose job is to find any image assets
that contain that body and remove them if they do.
This is another reason why we decided to shift from having the user
manage the list of assets to managing them in the asset engine: this way, we can
have body_remove interact with ASSET_LIST behind the scenes (which the user can’t
do because we’ve only provided an interface for body to them).
The general structure of asset_remove_body will be the following:
- Check if
ASSET_LISTisNULL(this is possible if a demo doesn’t use assets). If it is, return early. - Go through all the assets in
ASSET_LIST. - If the asset has an
ASSET_IMAGEtype and thebodyparameter is the same pointer as the body pointer the image asset contains, remove the asset from the list and destroy it.
Importantly, don’t break out of the loop once this condition occurs–multiple image assets could be pointing to the same body.
Finally, call asset_remove_body in body_remove.
Task 5.
Implement asset_remove_body in asset.c and call it in body_remove.
Once all your group members have finished, work with them to complete the extension (more information in the main project page).