Code Correctness
Throughout this course, we also want you to focus on your code quality in addition to the functionality of your code. For the complete list of code quality items we’ll look at throughout the quarter, please consult the code quality document. If we see code quality issues during code reviews, we will ask your group to resubmit the project with those issues fixed.
Deliverables
This week we will add some substantial “upgrades” to the scene and body abstractions. These “upgrades” would have been necessary to implement for your game anyway, though. The “upgrades” include:
- Collision Detection (but NOT resolution–that’s next week)
- A
void *“info” body field - Deferred body removal (see below)
It might seem like there’s a lot of info being thrown at you this week, but don’t worry! You’ll have lots of starter code and psuedocode to work with.
Physics Engine
As usual, we will need more features to implement the new demo. Most of them are described in the documentation, but we repeat some important information in the spec below.
Copying files Over
First, copy over the following library files from last week’s project:
body.csdl_wrapper.cvector.c
You may also have to copy code from last week’s forces.c and forces.h if
your teammate added helper functions/structs.
The teammate working on the game portion of this week’s project may have modified sdl_wrapper.c.
If they already made these changes, make sure not to override them!
Delayed body and force creator removal
Because our demo this week uses destructive collisions, bodies will be removed by collisions which needs to trigger the removal of related force creators. Giving the scene access to the relationship between bodies and force creators allows it to take ownership of managing their lifetimes. That is, the scene can now be responsible for actually freeing the bodies and removing the force creators from itself.
This gets very convoluted very quickly if we attempt to have the force
creators do this work; so, we’ll employ another design pattern: delaying action. We will make scene_tick responsible for actually doing the removal at the end.
Thus, we’ve added the body_remove and body_is_removed functions this week.
They will be used to manage a “flag” that indicates if a body is ready to be deleted by the scene
rather than actually deleting the body.
Make sure to review the documentation in the body and scene header files for specifics.
Consequently, we’ll need to “deprecate” the old function scene_remove_body.
Library writers can mark functions as “deprecated” if they should no longer be used,
but they still need to exist for backwards compatibility.
All body removals should be done with body_remove moving forward.
Thus, you’ll have to modify scene_remove_body so that it uses body_remove
instead of actually removing the body from the list of bodies.
Task 1a.
First, copy over your scene_t functions from last week except for
scene_tick which is provided for you in scene.c.
Next, implement body_remove and body_is_removed (you will have to modify the body_t struct and body_init), and modify scene_remove_body
to ensure backward compatability.
Finally, you’ll have to implement our new scene_tick method. The order of removing
and free’ing things can get pretty complex, so we’ve included some pseudocode
and helpful hints. Make sure to replace the comments with your code once you’re done;
they are there for clarification.
Note: Since we’re traversing through lists and removing items, we’ll have to
decrement the index whenever we remove something (since the for loop will increment it
back in the next iteration). However, there may be a case where the index is 0 and
we try to decrement it before incrementing it, which will cause a size_t underflow.
Thus, we’ll have to use a ssize_t instead of size_t.
Task 1b.
Implement scene_tick.
Run make bin/test_suite_scene and ./bin/test_suite_scene to see if you pass the tests.
Body “info” field
Different applications will need to use different extra information about bodies. For
example, for Space Invaders, you will need to be able to differentiate between the player
and enemies. Thus, we will need to add auxilliary data to the body as a void *.
Since this means there is extra information to pass into body_init, this will necessitate creating
a second constructor that includes a value for the void *. You will also have to modify the body_t struct.
Task 2.
Modify the body_t struct and implement the new body_init_with_info, and body_get_info functions.
Next, modify body_init to use your newly implemented body_init_with_info
method and update body_free based on the new changes we’ve made.
Run make bin/test_suite_body and ./bin/test_suite_body to see if you
pass the tests.
Collisions
Finally, you will implement collision detection, i.e. checking if two polygons intersect. For simplicity, we will assume the polygons are convex. You must implement the separating axis method to check for collisions:
Check if there is a line that separates the polygons, putting one polygon on each side of the line. This method will require minimal modifications to implement collision resolution next week, since it already computes the direction that the polygons bounce off.
Separating axis
Aside: Projection
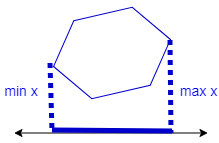
The projection of a polygon onto a line is the line segment containing the projections of all points in the polygon onto the line, shown as the thick blue line below. For example, if the line is the x-axis, the projection of the polygon is the segment from the minimum x value of any vertex to the maximum x value of any vertex.
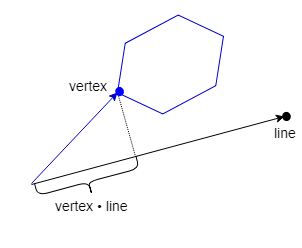
The projection of a vertex onto a general line can be found by the dot product of the vertex with a unit vector pointing along the line, since that computes the component of the vertex in the direction of the line.
To find the projection of a polygon onto a line, we compute the dot product of each vertex with the line’s unit vector and take the minimum and maximum values.

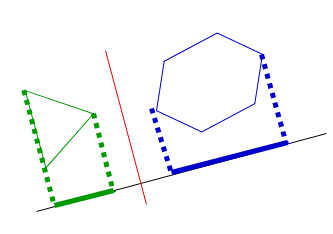
Separation
Two polygons do not intersect iff the projections of the polygons onto some axis (black) do not overlap. The red line perpendicular to this axis is a separating axis: the axis splits the plane with one polygon on each side.
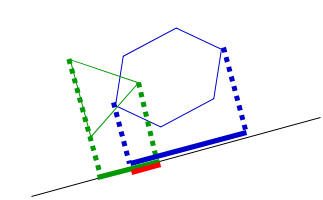
Two polygons intersect iff the projections of the polygons onto all axes overlap. The red line shows the overlap.
It is not sufficient to check a single axis, since every pair of polygons has some axis where their projections overlap. However, if there is a separating axis, then without loss of generality, there is a separating axis perpendicular to an edge of one of the polygons. For example, if one polygon has 3 sides and the other has 6, we need to check 9 axes (those perpendicular to the 9 edges) to be sure the polygons intersect.
If the projections of the polygons onto one of those axes do not overlap, you should conclude that the polygons do not intersect and skip the other axes. If the polygons are far apart, then their projections onto most axes will not overlap and this algorithm will quickly determine that they do not intersect.
An example with all axes drawn (from http://www.dyn4j.org/2010/01/sat/):
An example where some projections overlap, but others do not such that there is a separating axis (red):

For more information see http://www.dyn4j.org/2010/01/sat/ or https://gamedevelopment.tutsplus.com/tutorials/collision-detection-using-the-separating-axis-theorem–gamedev-169.
Collision Implementation
We know collision detection is complicated, so we’ve provided you with a few
helper functions and helpful hints in collision.c. Once you’ve understood the
algorithm, read over collision.c in its entirety
before you start coding. This will make coding it a lot easier.
If you are looking for a value to represent a “minimum”, use -__DBL_MAX__ instead of __DBL_MIN__!
Task 3.
Implement get_max_min_projections and compare_collision in collision.c,
replacing the TODOs with your code.
Once you’re done, run
make bin/test_suite_collision and ./bin/test_suite_collision to see if you
pass the tests.
Once you’re done, ensure that you’ve passed all the tests by running make test.
Once all your group members have finished, work with them to complete the extension (more information in the main project page).