Code Correctness
Throughout this course, we also want you to focus on your code quality in addition to the functionality of your code. For the complete list of code quality items we’ll look at throughout the quarter, please consult the code quality document. If we see code quality issues during code reviews, we will ask your group to resubmit the project with those issues fixed.
Implementing the engine is a prerequisite for implementing the demo!
If you haven’t already, please do the Setup for the course!
Goals and Deliverables
This week, you will build a basic pacman game that uses a basic library that one of your teammates implemented.
We think it is important to “see” your work as you go. So, every week, your team will write a small simulation that uses the engine work you’ve completed that week. These will get ever closer to “correct” physics as we go!
Ticks and the Main Run Loop
We’re going to be working through a lot of graphics-related code in this class, so it’s important to understand the basic concepts behind drawing graphical content to the screen.
When we talk about graphics in the context of writing software, we are dealing with computing the contents of individual frames in real-time, clearing the canvas of the previous frame, and drawing the new computed frame, all at regular intervals. If you want your graphics to look realistic, you need to have a reasonable measurement of the time between frames, since our goal is to generate a graphical representation that is independent of the speed at which frames are processed by the computer. This is why low frame rates in graphics-intensive games result in a scene that is choppy – each frame encompasses a large amount of real-world time, causing objects to move large distances in each frame. The most basic implementation of a graphical application, then, looks as follows:
while app_is_running:
    dt = time_since_last_frame()
    object_pos = compute_new_positions(object_pos, dt)

    clear_screen()
    draw_frame_offscreen()
    display_frame()
We’ve provided a few helper functions to help facilitate writing these functions. You can see how they interface with the lower-level SDL2 library in sdl_wrapper.c.
Files of Importance
It will be extremely helpful to look through the actual files mentioned in this guide while reading it. You’ll have to look through these files eventually so it helps to gain context on them now!
The above basic loop is implemented in emscripten.c, which relies on a number of functions you will write in your demos - namely, emscripten_init, emscripten_main, and emscripten_free. emscripten.c serves as the basic functionality of all our demos - you do not need to modify this file. Notably, because emscripten.c implements the main while loop described above, your pacman.c file should not have a main loop.
The header file for the functions you write in your demo is state.h, which tells emscripten.c that these three functions are properly defined elsewhere. You do not need to write a state.c file - you should write the three functions in the header in your pacman.c demo as mentioned above. Notably, state.h also includes an opaque type definition for a “state”. This is a struct that you will define in each of your demos (here, in pacman.c). This state struct is how you will pass information between your three functions - anything you initialize in emscripten_init that you need in your emscripten_main loop should be put in this state accordingly and returned. You are responsible for defining the state’s parameters, malloc’ing it in emscripten_init and freeing it in emscripten_free.
Using the basic breakdown of the files above, and the documentation in sdl_wrapper.h and state.h, you should be able to get a good idea of how to implement a graphical application in C, using our wrapper library.
For a reference of a working demo that uses this overarching structure, please consult https://gitlab.caltech.edu/cs18-26sp/emscripten-demo.
Although it does not use the same abstractions, the circle.c demo works with emscripten.c and state.h in the same way you will.
Deliverable
Helpful Tip for Debugging: Run your game in Chrome! Other browsers may have issues with emscripten, and you can also debug and see what you print in Chrome by right-clicking and clicking “Inspect” and “Console”.
Task 0.
After carefully reading the APIs we provide for you in sdl_wrapper.h and state.h, create a pacman demo that should look something like the following (we’ve included a keyboard viewer on the left to show you what key is being pressed–this is not part of the demo). For reference, here is a short
video of the reference solution in action:
This week’s demo is a pacman-like game in which pacman runs around the screen eating pellets. A major part of the demo is keyboard events–the user should be able to control pacman using the arrow keys. To implement this, we recommend
thoroughly reading through sdl_wrapper.c/h.
We expect your demo to contain the following:
- pacman should move around and change direction based on the arrow keys
- pacman should accelerate proportionally to how long the key has been held down
- pellets spawn in random locations at a fixed interval (a function in
math.hwill be helpful for this) - when pacman runs into a pellet, it should disappear
- pacman should “wrap around” the screen in both directions
In pacman.c, we have given you some starter code to create the pacman shape and pellet bodies.
However, the rest of the demo is left to you.
You should write your emscripten_init to initialize everything you need for the demo, including the SDL window itself (you will find functions in sdl_wrapper.c to be useful here). Then, in emscripten_main, you should update the position and velocity of your pacman
based on the arrow key that is pressed, how long the key has been held for, and the time elapsed since the last frame. When the demo exits, emscripten_free is called, so you should write this function to clean up all the memory you allocated in the demo.
One of your group members should’ve implemented body_t, scene_t, and vector_t.
Talk to them to get a sense of how to use these structures and how they are implemented.
We’ll also point out a few things about list_t that should help with interacting with them:
- Notice that the elements of
list_tare pointers (void *), not values! -
list_initcontains afree_func_tparameter. Thefree_func_ttype is defined at the top oflist.h. Essentially, it’s defining thefree_func_ttype as any function that returnsvoidand takes in avoid *(generic pointer). - You can’t see the implementation of
list_free, but suppose we didn’t take in afree_func_tparameter. Then a reasonable (and probably the only valid) implementation oflist_freeis tofree()every element that it contains, and then to free thelist_titself. However, what if the objects inside thelist_tallocate memory for their fields? In the case for an object likebody_t,free()would only free the space allocated for thebody_tstruct, but not any of the fields that might be allocated inbody_init(), leading to memory leaks. Thus, we pass in afree_func_tso that thelist_tknows which function to run on each element whenlist_freeis called. In the case of ourbody_texample, we would initialize alist_tof bodies withlist_init(capacity, body_free). - Importantly,
list_ttakes ownership of its elements depending on iffreerisNULLor not. IffreerisNULL, then thelist_tdoesn’t free its elements whatsoever whenlist_freeis called. This might not be relevant to this project, but it will be if you ever want to keep ownership of an item while adding it to alist_t.
Running and Testing your Code: make and the Makefile
All the projects in our class will have the following directory structure:
- include: header files go here
-
library: source files for your libraries (e.g.,
list,body, etc.) - demo: source files for the demos go here
- game: source files for the game go here
- tests: test source files go here
- out: built object files will be generated here
- ref: reference object files for the demo and game are provided here
- bin: built binaries will be generated here
We have provided you with a Makefile which is set up to build the project. It allows you to run the following commands:
-
make demo: compile the demo and runs the web server -
make game: compile the game and runs the web server -
make test: compile all libraries and tests and run all the tests -
make NO_ASAN=true democompiles the demo without asan - this is recommended if the demo lags. -
make server: Run the web server with the current binaries -
make clean: remove all generated binaries
This year, we will be testing demos via a web interface hosted on labradoodle, using a library called emscripten.
Every student has been assigned a port, which you can see after running make demo or make server, or by running cs3-port in a shell on labradoodle.
To run your demo, you should run make demo or make server and then navigate to the link printed to the shell (the last line before “Serving HTTP on …”) and click the compiled demo .demo.html file. If you see an error that says Address already in use, please run cs3-kill-web in the terminal and rerun make demo. If you’ve made changes to your code but make demo generates the link instantly, you might have to run make clean
before make demo again to recompile the demo.
One additional part of testing any game/demo code will be ensuring that there are no memory leaks. For the
physics engine, we can run the leak sanitizier after the test finishes, but for demos/games, there is no obvious “end of execution” unless the player loses/wins, which isn’t always defined. Thus, we’ve set up the “esc” key
on the keyboard to run emscripten_free and kill the demo/game when pressed. Once you press “esc,” you should
be able to see any memory leaks if you Inspect Element and go to “Console.” If you see any memory leaks,
make sure to fix them!
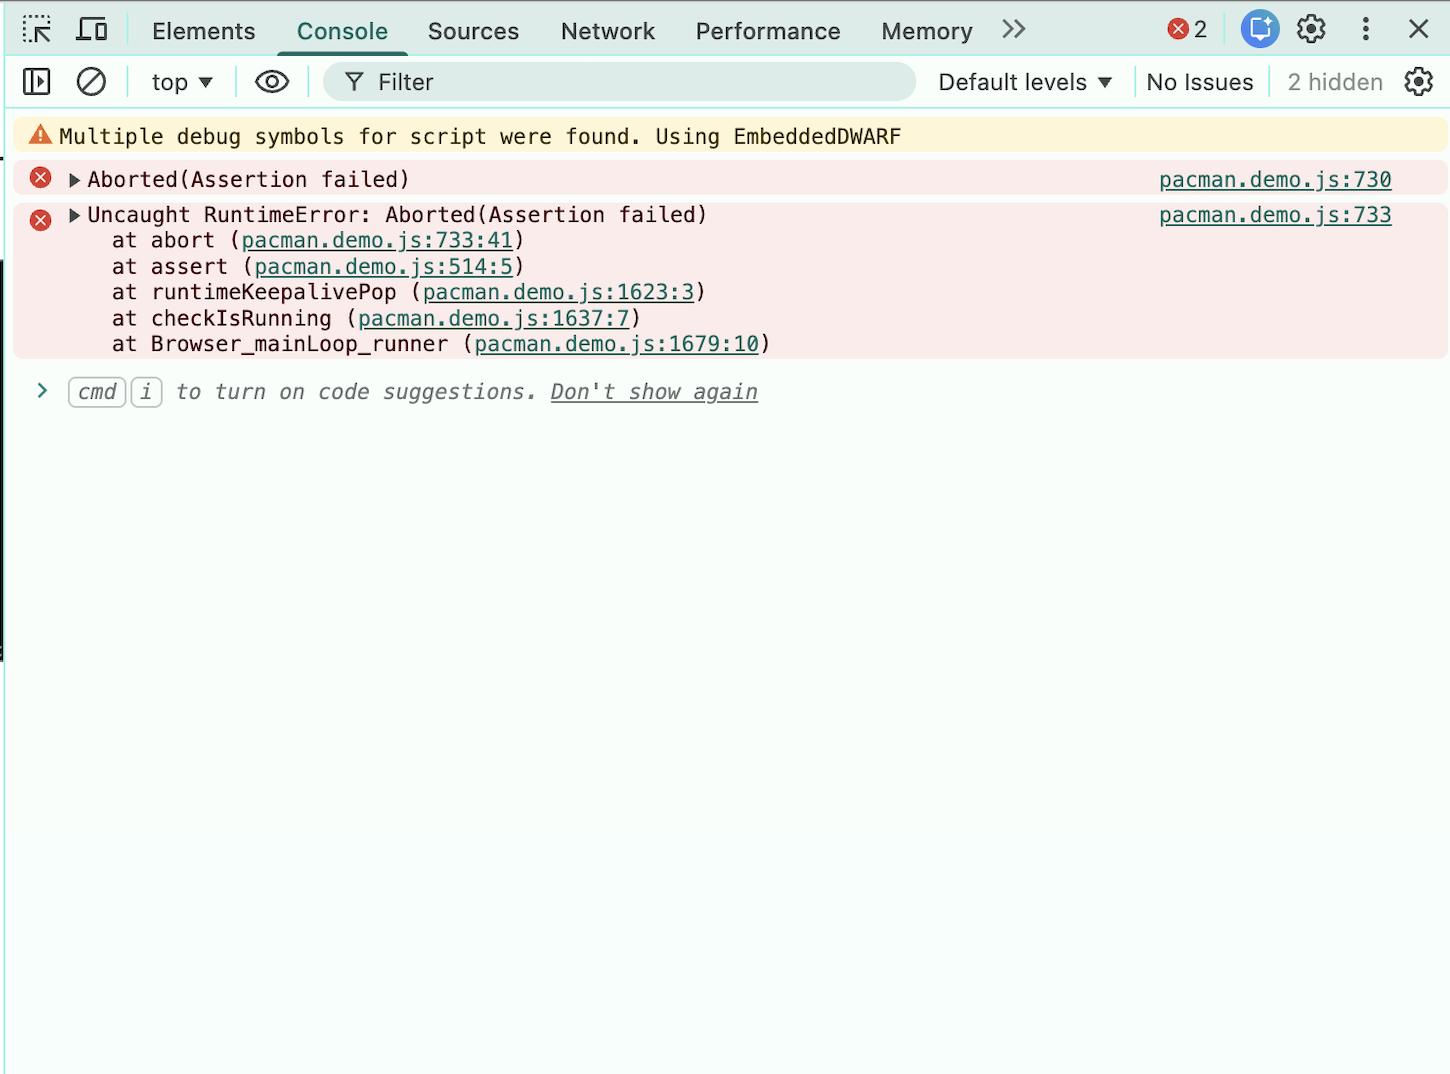
If there are no memory leaks, the console should look like this (you can ignore the RuntimeError which will always get thrown when we kill the demo):
If there are memory leaks, the console should report the lines that are causing them like this (the relevant lines are boxed in blue):
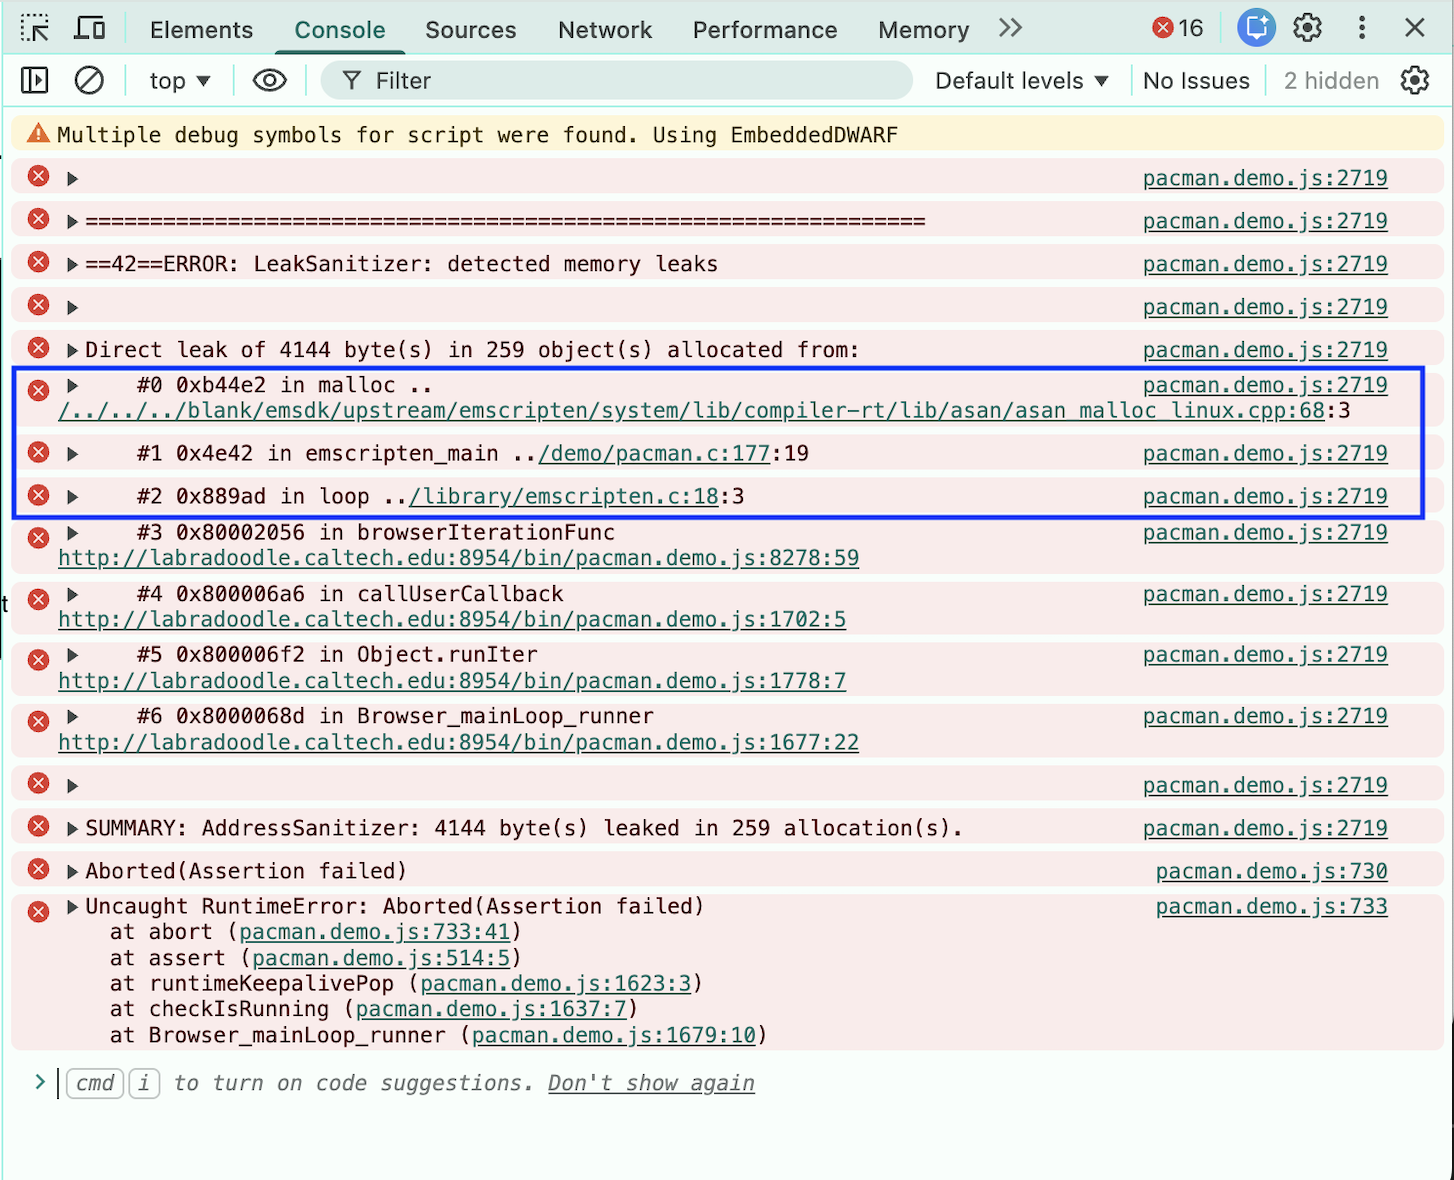
In this example, the memory leak was caused by our malloc call on line 177 of pacman.c.
Note that there is nothing special about the “esc” key in this case; we’ve just chosen to bind it to emscripten_free. Once you start working on your final game, feel free to change this keybinding, but
please don’t do so until we are done with all the projects this term.
We will take off points if your code has memory leaks, so be sure to check for them before you submit your code!
Once all your group members have finished, work with them to complete the extension (more information in the main project page).